|
|
|
Strategically leveraging clips from movies that show various phenomena (accurate or not) can be a powerful way to spark student questioning. Whether it be challenging them to point out a specific mistake that the clip embodies, or proving the accuracy of the clip, movie clips, specifically in the sciences, provide a great opportunity for engaging students. Downloading and trimming the clips locally, or using tools like Vibby or TubeChop to present portions of the clips to students online are both strategies I use often. Below are my 15 favorite clips to use as science curiosity sparks (note: most of the clips are chemistry related given that is the primary subject I teach. Apologies). All clips are taken from YouTube.
Central to the PBL Cycle (see Buck Institute for Education for more info), is the "Public Product" as a final showcase of learning. See image below:
Transcending PBL, I have been tinkering with the concept of a "Public Product" and how to authentically do this in my class beyond a blog post, google document, or the myriad ways I have had students showcase their products to real audiences beyond the walls of our school. All efforts felt/feel forced.
To tackle this in problem, in my Introduction to Robotics Class this year, in addition to our final showcase for teachers and parents where students presented a table (museum style) of their final invention, I showed students various "pitch" videos from the crowdfunding site Kickstarter, and challenged them to imagine that they were doing the same, and to create a video for their invention as if they were going to build a campaign around it. Click here for the simple instructions I gave to my students. Albeit a hypothetical scenario, by starting with actual videos that contain real dollar amounts raised visible next them, the reality and power of showing your work in beautiful an meaningful ways online was evident. See a sample screenshot from a sample Kickstarter project below. Click here for the pitch video. 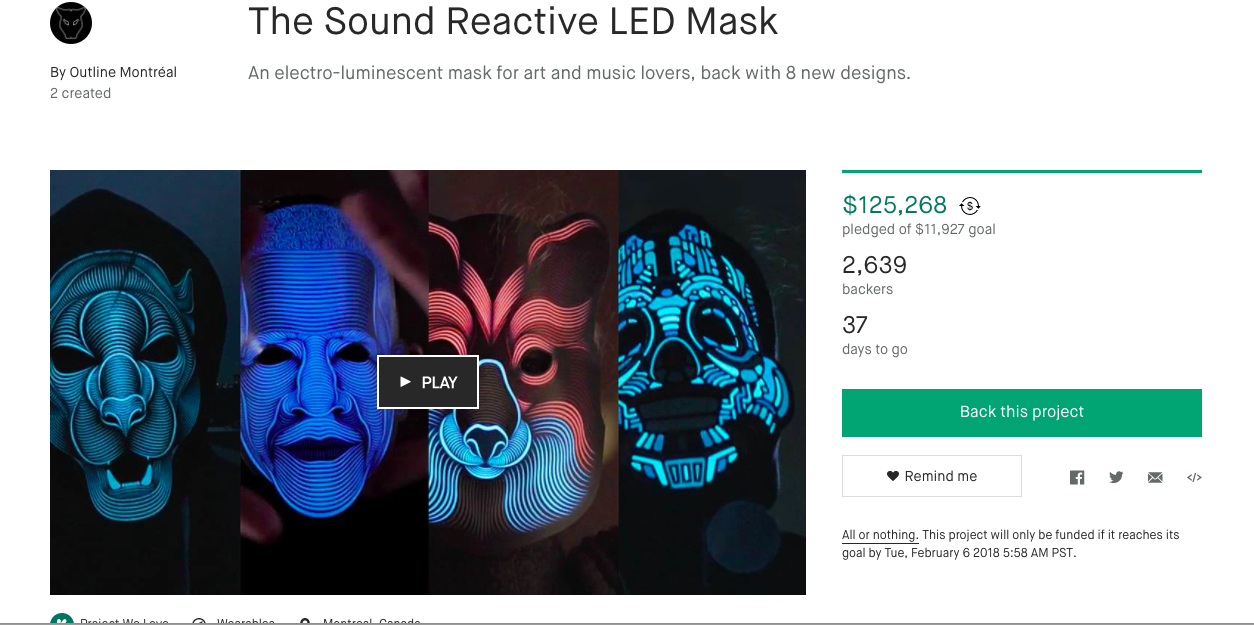
To be honest, 5 minutes showing my students pitch videos from Kickstarter empowered them to produce amazing public products more than any rubric, speech or guest lecture I have prepared for them. The final showcase was amazing and their pitch videos, although rough drafts done on via their phone cameras in one class period, embodied and relayed a feeling of potential.
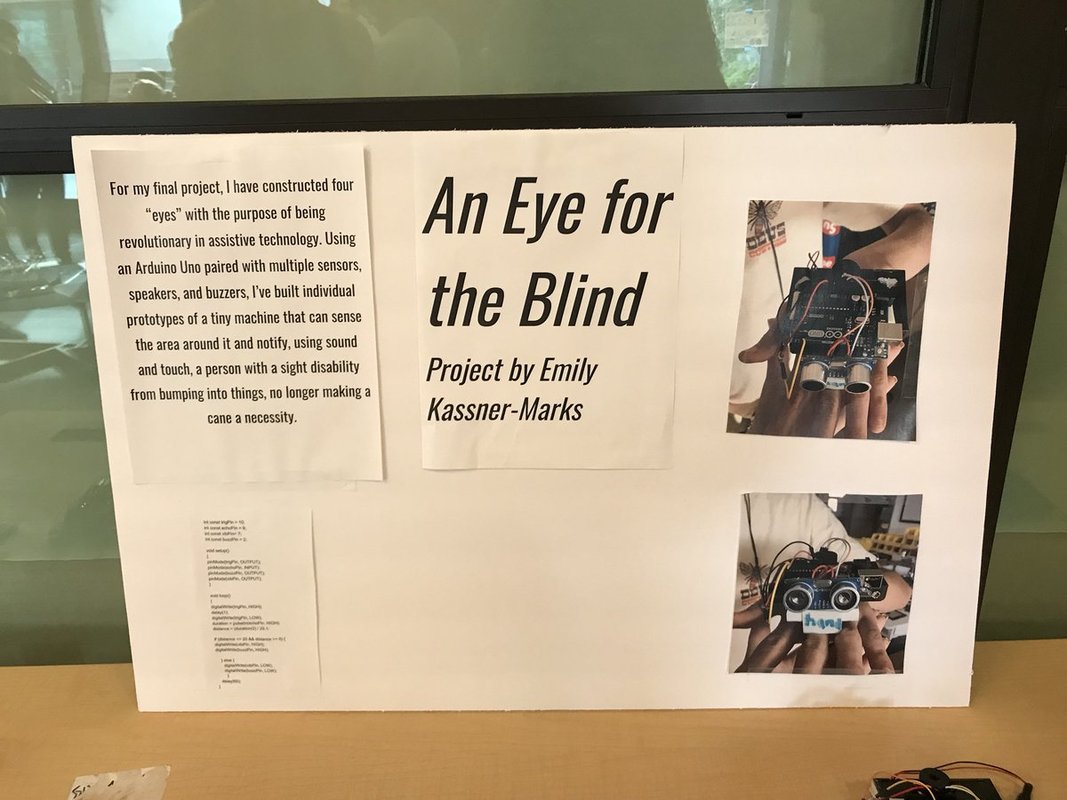
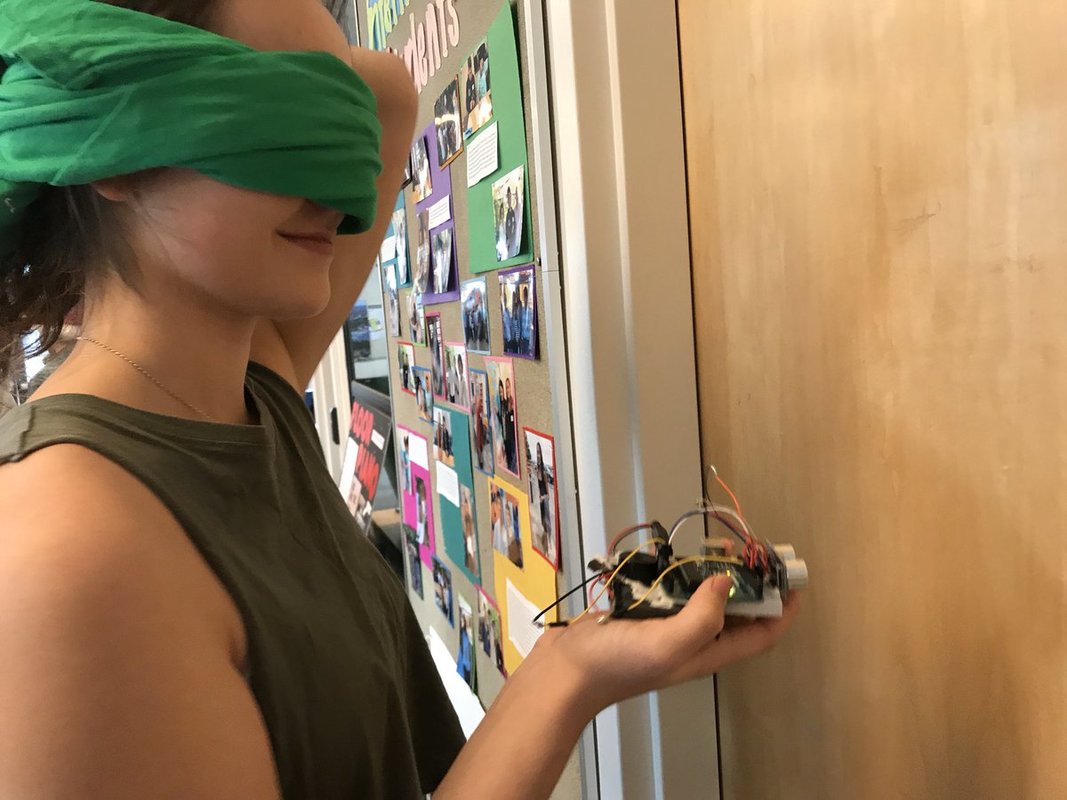
Below are images from one students final project (an Arduino ultrasonic cane for the visually impaired).
Last year a new feature was added to Google Forms which allows users to submit a file (picture, video, document, etc.) when completing a form. Today in class I leveraged this feature to facilitate the curation of a student generated study guide for an upcoming chemistry assessment. Because chemistry assessments usually involve the production of a handwritten graph, diagram or chemical structure, I had students submit a question in text, then upload a written answer using the file upload feature. Click here to see the live form. Below is a screenshot of the form. 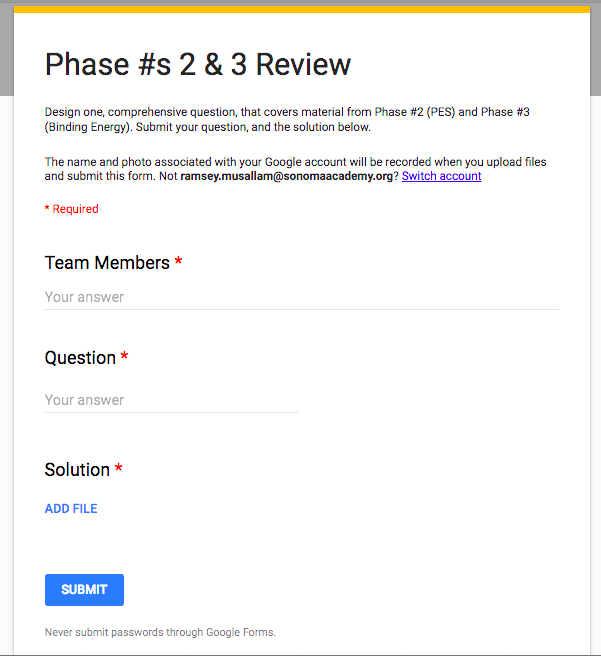 When all groups completed their question and answer an associated, organized spreadsheet was created that, when made available to students, contains a question and link to a clear, handwritten answer from each group. Students used their phones to capture the image, and either accessed the form directly from their phone and uploaded via the photo library, or emailed the image to their computer to be uploaded. Click here to see the live form. Below is a screenshot of the form and a submitted picture. 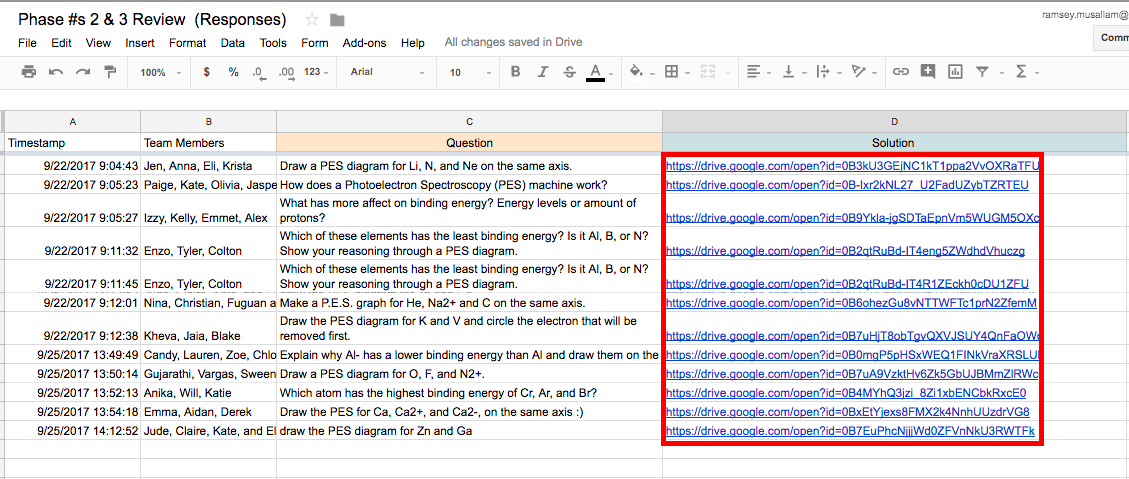 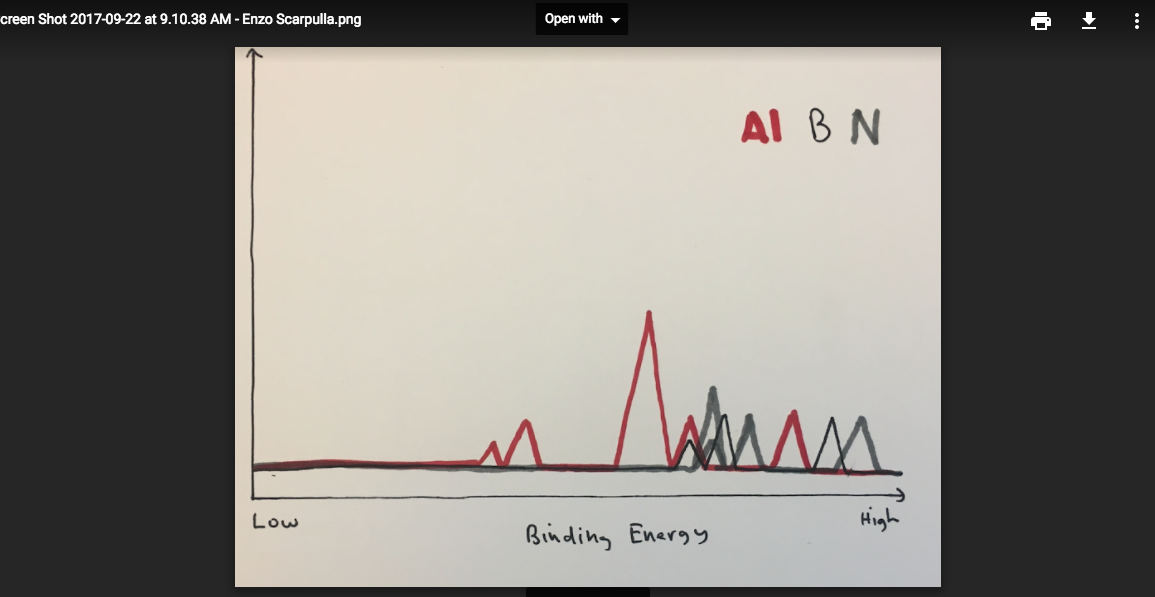 If you are planning on implementing this, or a similar activity, please play close attention to the sharing settings in the folder that collects uploaded documents.  If you do not adjust the settings to "public" in the folder (that is automatically created when you publish a form with a file upload feature) students will not be able to access the links generated that point to this folder. In the case of the activity described, the ability to access the files is necessary for students to view the document. Additionally, the "file upload" feature does not work unless the user submitting the form is part of the same domain.
Last week, in an effort to keep both my sections of Honors Chemistry moving at the same pace, I found myself with a day to spare in one section. With a unit on lab techniques, specifically titration, quickly approaching, my thought was to pre train this section on the specifics of the laboratory procedure.
Simultaneously, a more playful side of me wanted to bust out the MakeyMakeys from summer science camp and give students some time to explore conductivity, and tinker around a bit repurposing everyday materials to build something just for fun. Then it hit me: Why couldn't we do both? Back to titration. Digital Drop Counters used to measure the precise volume titrant added to a flask are nearly $100 with the need for more complex software companions for reading data. This it hit me: Could we recreate a Drop Counter using MakeyMakey (along with the pH probes we already have) to simulate the tools we needed for a successful titration? Yes. Sort of! But super fun. With the help of a few students we devised a simple workflow: First, students wrote a simple program using Scratch that counted clicks when the space bar was pressed. Then, using some fancy graduated cylinder action measured the approximate volume of 1 drop from our Burets, and added a variable to their program that also counted the volume (in mL) of liquid added along with drop number. 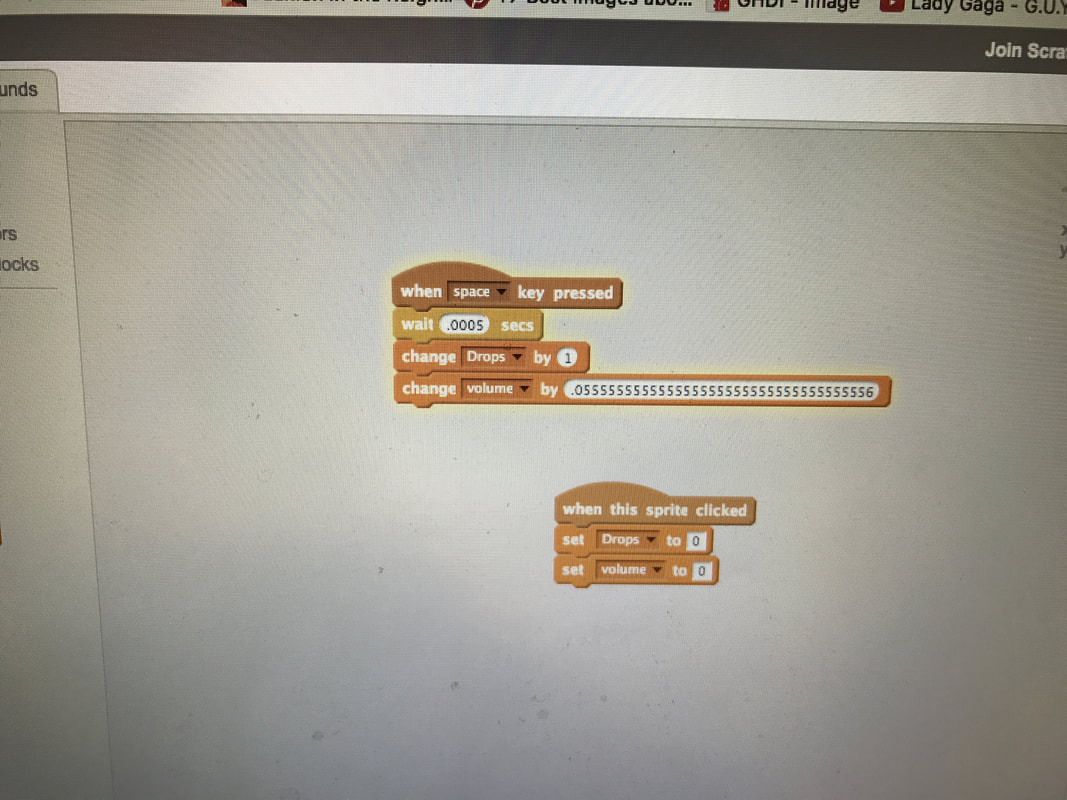
Then for the MakeyMakey! By positioning two wires (one connected to ground and the other to the space button on the MakeyMakey) above the Erlenmyer flask with just enough room for a single drop to complete the circuit, and adding some code to delay the click function for any drops that "stick" to the wires, we were able to accurately measure drops added! Finally something more than a video game controller or banana piano!
It's absolutely no secret that I'm a huge fan of leveraging the MakeyMakey circuit (http://makeymakey.com/) as an instructional device. While there is an obvious connection with such things ha as inventions during a youth science camp, or more creative solutions such as challenging high school chemistry students to create titration "drop counters", the ease of entry and almost limitless potential of this device is incredible.
That being said, the simplicity coupled with power of the MakeyMakey can at times make it seem often, especially for younger learners, as a toy rather than what it is: a modified Arduino Leonardo microprocessor. Keeping this in mind, I have been on a journey over the past two weeks to try and leverage the Arduino Leonardo as a MakeyMakey to create a much better flow in my high school robotics class between programming with the Arduino UNO, and transitioning into using the MakeyMakey as a remote control device. For example, beginning the year with the Arduino UNO grounds students really well in basic line coding and also input-output microprocessing. From there we transition into using the mBOT, given it's integration with the Arduino language. The integration with the Arduino IDE provides a fabulous flow for high school robotics students. Moreover, with the introduction of the 2.4 GHZ wireless connection between the mBOT and a computer (does not work well with chromebooks) students can easily use Arduino to create their own computer based remote control for the robot. An obvious connection at this point would be to then leverage the MakeyMakey to create their own remote control repurposed from every day objects such as aluminum foil and Play-Doh. In past years this is been very successful and I say things like "all your long we've been using the Arduino and now you're using a modified Arduino to control an Arduino robot!" Students love this but because the MakeyMakey is so simple to use it's hard for students to make a connection between a raw Arduino interface and the modified appearance of the very aesthetic and simple MakeyMakey. Back to my point. I am happy to say that I have successfully been able to re-create a MakeyMakey from an Arduino Leonardo and I am very excited to use this in the last phase of robotics class this fall! I am hopeful that the raw look of the Arduino Leonardo with the exact same functionality of a MakeyMakey will create a sense of connectedness in the course for students beginning with simple Arduino UNO programming, ending with leveraging the Arduino Leonardo to create a MakeyMakey mBOT controller. At the conclusion of the year I will show them then the modified Arduino Leonardo "MakeyMakey" as a way of emphasizing invention and accessibility for all. Below is the instructional video I used as a guide in the creation of the Arduino Leonardo based MakeyMakey Feel free to reach out if you have any questions and expect future blog post on the efficacy of this integration. |
Ramsey Musallam is a full-time science teacher in Santa Rosa California.
Categories
All
Archives
February 2024
|


 RSS Feed