|
|
|
Yes. I know what you are thinking. This entire post is mute given the functionality of Google Classroom or the myriad of other scripts. However when I want to quickly share a Google Doc template with students or teachers whom I am working with for a short period of time (workshop, science camp, etc.), this process works great. Below is the logic and video tutorial.
Logic Creating a template from a Google Doc is extremely useful when you want to streamline the way students gather data, or engage in a unified activity. When the ridiculously long Google Doc URL template is created (see below video for method), writing a short version, customized URL on the board is very efficient. By customizing the link students do not confused "1" for an "l" an "O" for an "0", etc. Tutorial
One of the most powerful ways to sparkInvoluntary Curiosity in students is to strategically trim a video clip to either remove content or present an unresolved representation of the content. Both of these techniques leave students with questions as to what information was missing, or what the final result will be.
Because internet speed and access to YouTube varies in schools, downloading the desired clip from YouTube, then strategically trimming the video to be played locally is a powerful technique. I often have a trimmed clip playing on repeat loop in Quicktime as students enter the room in an attempt to grab their attention and spark their curiosity immediately. Below is a short video outlining how I download and trim video for curiosity using technology I use savefrom.net & Quicktime. In this video I am downloading a clip from the movie Fight Club in an attempt to spark student questioning around Acid-Base Chemistry. Last year a new feature was added to Google Forms which allows users to submit a file (picture, video, document, etc.) when completing a form. Today in class I leveraged this feature to facilitate the curation of a student generated study guide for an upcoming chemistry assessment. Because chemistry assessments usually involve the production of a handwritten graph, diagram or chemical structure, I had students submit a question in text, then upload a written answer using the file upload feature. Click here to see the live form. Below is a screenshot of the form. 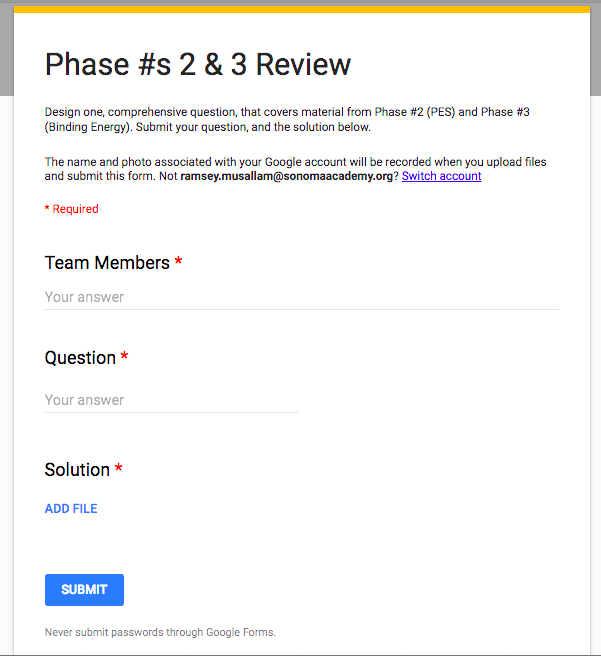 When all groups completed their question and answer an associated, organized spreadsheet was created that, when made available to students, contains a question and link to a clear, handwritten answer from each group. Students used their phones to capture the image, and either accessed the form directly from their phone and uploaded via the photo library, or emailed the image to their computer to be uploaded. Click here to see the live form. Below is a screenshot of the form and a submitted picture. 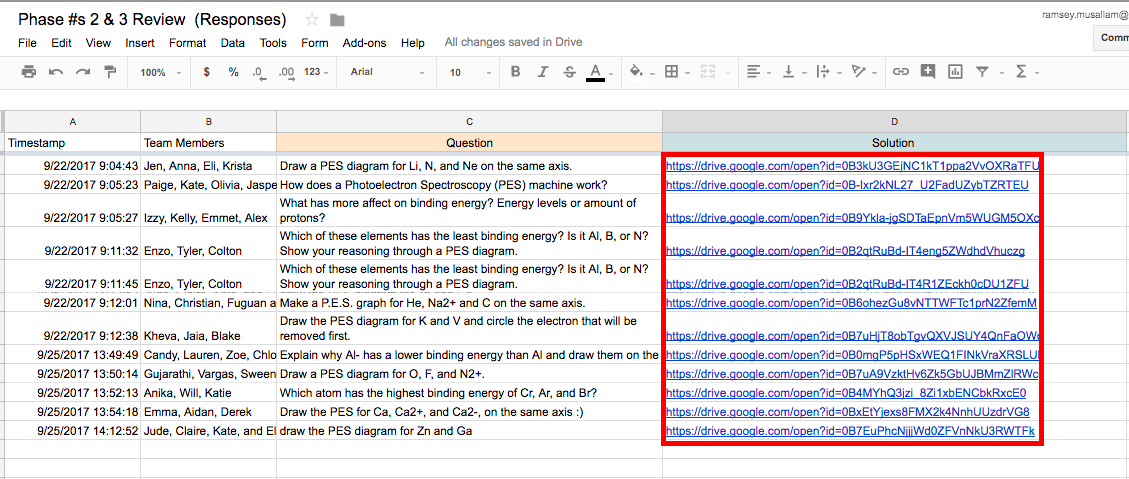 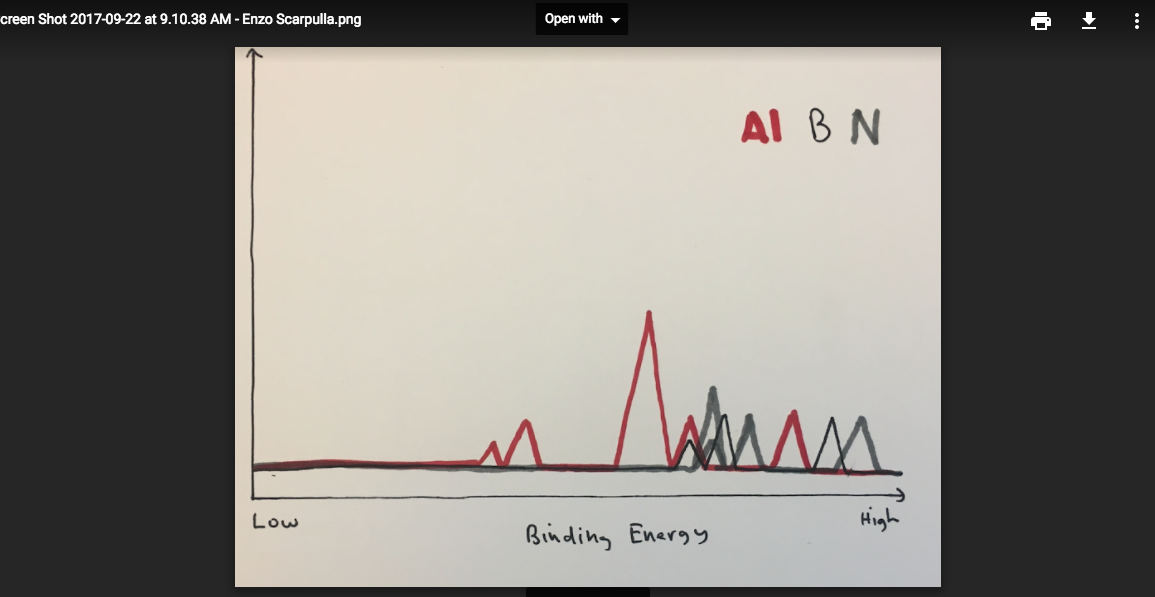 If you are planning on implementing this, or a similar activity, please play close attention to the sharing settings in the folder that collects uploaded documents. 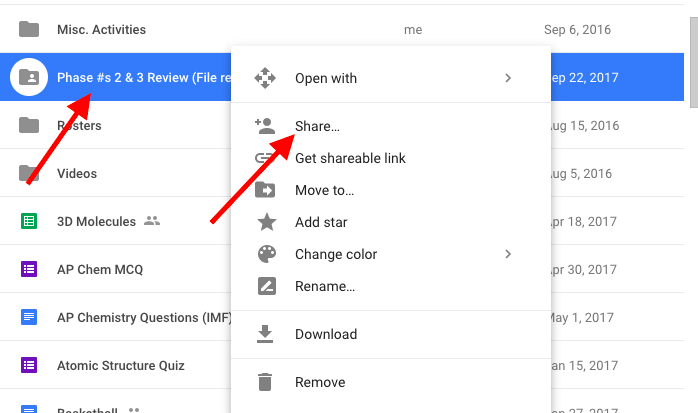 If you do not adjust the settings to "public" in the folder (that is automatically created when you publish a form with a file upload feature) students will not be able to access the links generated that point to this folder. In the case of the activity described, the ability to access the files is necessary for students to view the document. Additionally, the "file upload" feature does not work unless the user submitting the form is part of the same domain. Like many teachers, I have always struggled with making assessment meaningful for students. After reading Show Your Work by Austin Kleon I moved from student Google Doc lab reports in chemistry class to blog posts. My goal was for student to build a public archive of curated work that students can feel proud of. For the past few years student blogging has been a success. Click here for an archive of this year's chemistry blogs.
Keeping the above in mind, this is my first year teaching a robotics class in the curriculum and I wanted to institute the same blogging strategy. Unlike chemistry, my robotics class didn't show as much enthusiasm about the blogging process. When I asked one student why his answer was fascinating: "The stuff we make in Robotics class doesn't feel like school. It feels real. Blogging feels like school. They don't really match." Over the past two years, many of these student's teachers have embraced blogging, and while I firmly believe it to be a powerful, public and authentic medium for sharing work, it was clear from the above response, and others I have gathered, that the students yearned for a more authentic, less contrived vehicle to break down the barrier between the "real-world" and school environments. Our answer: Instructables! Whenever I have to learn how to create anything I, and my students, use Instructables. It's just what we do. Because Instructables represents a place where "real" people, go to create "real" things, and is run by a "real" company (Autodesk), whose software we use to create "real" prototypes, it felt like a perfect place to help students, in a Robotics class where building authentic "real" prototypes is core to the class ethos, engage in a type of "real" world product showcasing. Once the decision was made (two weeks ago), I jumped in headfirst, and invited students to use Instructables to post not only share their most recent inventions, but outline their design process. The student's products exceeded my expectations and reminded the power of not only a public product, but also how the power of outlining and unpacking the invention process into steps for others to follow. Instructables provides a fabulous medium where this process happens, not via a teacher created rubric, but via observing the thousands of examples that already exist on their website! Below are three student created examples from my Robotics class at Sonoma Academy.
Each year the technology I leverage in the classroom changes. In search of an increasingly simple, efficient, and streamlined set of tools, I have slowly converged towards the list below. Although significantly shorter than the list from a few years ago, the below tools are chosen solely because they help accomplish my pedagogical mission to spark, organize and quench student curiosity. If you have any questions as to how the below set of tools were specifically leveraged to meet the above mission, please reach out. #1: Remind
#2: Blogger
#3: SaveFrom.net
#4: Weebly
#5: Google Forms |
Ramsey Musallam is a full-time science teacher in Santa Rosa California.
Categories
All
Archives
February 2024
|
 RSS Feed